Pages

Showing posts with label Home Decor. Show all posts

Tuesday, January 22, 2013

Ashley - Minnie mouse wall art

     Hey everyone! I hope you had a very happy holidays! I have been working on getting my little girls bathroom all set up for her. We are starting with introducing her to the potty so I want to make her bathroom a little more hers and make it somewhere that makes her want to go use that potty lol. So one of the few projects that I have been planning to do was find a form of wall art to put in there. Then I remembered Melody received a duplicate set of Minnie mouse puzzles at Christmas time.


     So instead of returning them or letting them just sit and get no use I decided to use those as my wall art so Melody could still enjoy them and they would get some use :) So I rounded up my supplies.


Supplies:
1 20 X 30 foam board
Black paint
Staple gun
7/8 in. molding
and I used my glue gun too

     So first off I got my loving husband to cut the molding for me, I have a hard enough time cutting my own fabric haha so I asked him to handle that one. While Ben was cutting I got to work cutting the foam board. Just take your time and be sure to measure twice, cut once ;)


Next came the painting. Now these puzzles aren't made with the most precision ever so when we were fitting the molding we notice little gaps where the puzzle warped a little so what I did was I painted the edges of the foam board as well as the molding so if the puzzles and the molding didn't meet absolutely perfectly then it would be no big deal because the white wouldn't show through.


     Once these were painted and dried I just decided to hot glue everything because well I couldn't find my wood glue haha. First I hot glued down the actual puzzle to the foam board.


     After that was taken care of, one by one I fit the molding pieces and then glued them down. When I was certain the glue was cool and everything was secure I took the time to touch up any little spots I missed painting. Finally for the last step instead of buying hangers what we did was we just put a couple staples in the back and cut a little of the foam board away by the staples. It's easy, quick, and you save money buying special little hangers. These are very light so there is real risk of it coming apart.


     And there you have it, your ready to hang up your brand new wall art and brighten up any space! 


     Here is a little sneak peek of the bathroom but my big project isn't done yet so you will just have to wait until I get finished to see the whole finished product. But while you wait I want to show you the other puzzle that we have done this with. This hangs in our dining room and you have seen pictures of it but you probably didn't recognize it. 


     See? A puzzle my husband and I finished and didn't want to put away :) Enjoy everyone!!! Pin It

Thursday, August 16, 2012

Ashley - Minnie Mouse Party Window Valances!

Hi all! I have been wanting to do these window valances ever since I got the idea for them when I did the table runners so I actually took the time and sat down to do them. Originally I was going to just sew those few seams and call it good but I thought that was just a little too plain and so I brainstormed and this is what I came up with :)


( Don't mind the one broken slot on the blinds, someone found out they were tall enough to reach them) Anyways this is totally adorable right?!?!?! This is how I did it.

You will need:

Enough fabric to reach all the way around your window

1in. white grosgrain ribbon

Black and pink felt

Valance rods

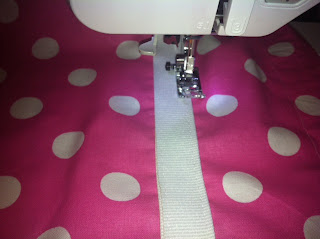
First I took my fabric and cut it down to 15in X 84in. I then folded both ends, pressed it and started sewing. Quick tip if you use fabric like this the polka dots will help you line things up and will help you sew straight lines so watch the polka dots!


After I got the edges done I moved onto the ribbon. When I sewed the ribbon on I loosened the tension a bit (between 2 and 3) and made my stitches longer.  


When I was done with that I moved to the next step, the Minnie head. Cut out your Minnie head of your black felt. I left the stitches long and just switched out my top bobbin to to black thread. Sew on your Minnie head.


And for the cherry on top, the bow. Get your pink felt and cut out the shape of a bow. Now with my bow since the head was sewn on all I did was glue the bow to the black felt of the Minnie head just to make it easier and since it's going to be just hanging you can cheat lol.


I had my husband put the valance rod up for me while I was finishing up and boom!


You have an amazing looking party decoration that you can move into your princesses room after the party is over :)


Enjoy!

Pin It

Thursday, March 29, 2012

Ashley - Sunburst Mirror

Hi there,
    I am Ashley and this is my first blog ever so please be gentle, I'm going to try to be as thorough as possible so this turns out the best for you. I made this beautiful custom sunburst mirror to help liven up a very bland living room.


It took me a few trips to every craft store in the area and wandering the aisles to formulate a plan on how I was going to undertake this project and this is how I did it. First this is what you're going to need:


A clock face (try to find one without the routered edges)

12 1/4" dowels

1 large mirror

3 packages of small mirror pieces

spray paint of your choice

and wall hanging hardware

For tools you will need something to cut the dowels (if you didn't buy the pre cut stuff), glue gun, hammer, ruler, a drill, and a pen.

Let's get going. First things first you need to cut yoru dowels. I wanted different lengths so I bought the 36" long dowel pieces and then cut them into 10", 12", 14" and 18" pieces. I ended up using 24 dowel pieces. After I was done with that started laying out how I wanted things to be.


This is what I came up with.


Next you will grab your clock face, ruler, and pen and divide the clockface into the same number of sections as you have dowels because you will be drilling holes into the side of the clock face to put your dowels into. 24 sections was a little tricky to figure out but with a little help from my hubby and some patience we got it figured out :)


Now drill a hole every spot there is a line. After you get done with that go ahead and put your hanging hardware on the back. Be aware of the holes so it will hang correctly for you.


Don't mind the paint I was playing with my color choice. Ok now get your dowels out and start gluing and them into their holes.


After all the dowels are glued in it's time to go spray paint, what I did was I did my first coat and I did a cherry red and then took my glitter cherry red paint and put it on top to add a little something.


After it's dry I brought it in and took my little mirror pieces out next to each dowel and started again with the glue gun.


And there you have it! You now have a sunburst mirror to hang up and look beautiful for you!

Pin It