Pages

Showing posts with label Birthday Party. Show all posts

Sunday, September 9, 2012

Melody's Minnie Mouse Party :)

     So yesterday was my little one's birthday and it was so much fun :) I wanted to download a few pictures to show you all the fun :)
 
 
My birthday girl :)


We had some great food made by my husband :) The background I made with gift wrap and my mickey mouse hole punch and some scrapbook paper.


There was a pinata...


and a bounce house...


and of  course new toys :) All in all it was a great day. Everyone had fun.


Pin It

Thursday, August 16, 2012

Ashley - Minnie Mouse Party Window Valances!

Hi all! I have been wanting to do these window valances ever since I got the idea for them when I did the table runners so I actually took the time and sat down to do them. Originally I was going to just sew those few seams and call it good but I thought that was just a little too plain and so I brainstormed and this is what I came up with :)


( Don't mind the one broken slot on the blinds, someone found out they were tall enough to reach them) Anyways this is totally adorable right?!?!?! This is how I did it.

You will need:

Enough fabric to reach all the way around your window

1in. white grosgrain ribbon

Black and pink felt

Valance rods

First I took my fabric and cut it down to 15in X 84in. I then folded both ends, pressed it and started sewing. Quick tip if you use fabric like this the polka dots will help you line things up and will help you sew straight lines so watch the polka dots!


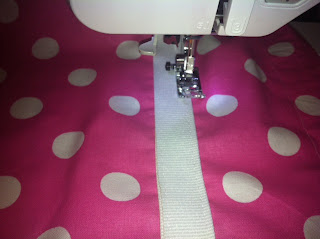
After I got the edges done I moved onto the ribbon. When I sewed the ribbon on I loosened the tension a bit (between 2 and 3) and made my stitches longer.  


When I was done with that I moved to the next step, the Minnie head. Cut out your Minnie head of your black felt. I left the stitches long and just switched out my top bobbin to to black thread. Sew on your Minnie head.


And for the cherry on top, the bow. Get your pink felt and cut out the shape of a bow. Now with my bow since the head was sewn on all I did was glue the bow to the black felt of the Minnie head just to make it easier and since it's going to be just hanging you can cheat lol.


I had my husband put the valance rod up for me while I was finishing up and boom!


You have an amazing looking party decoration that you can move into your princesses room after the party is over :)


Enjoy!

Pin It

Friday, August 10, 2012

Ashley - Minne Mouse hair bows

So I have come to the conclusion that I'm not I'm not going have the time to make Melody's whole outfit so I'm still trying to decide if I'm still going to try and personalize something myself or just completely break down and buy her something to wear. No matter what I decide I wanted to still make sure to amke something for her to make so I felt better about it lol. I have looking around on pinterest to get ideas and I came across some very adorable hair bows on this website http://girlythingsbows.com/mouse_ear_clippies.html. This webiste has the full tutorial so go take a look. I made a goof and didn't buy the 1/4 in. balck grosgrain, my mind was completely somewhere up and I ended up with 1/8 in. ruban. OYE. lol so mine look different for that reason, but even so they still turned out pretty dang cute I think.


As you can tell I tried two different bows, I felt like the bigger bow was just a little over powering so I tried the smaller bow and all I did was took a 2 in or so piece of ribbon glued the ends together then creased it in the middle and then took a very small scrap of ribbon to glue around the middle and thus you have my smaller bow.


Which do you like better?


I can't wait for her party! September 8th is the day of it so make sure to keep checking back!!!


 Enjoy!


Pin It

Thursday, August 2, 2012

Ashley - Mickey/Minnie party favor bags!

Now I have to make the Minnie version of this still but I wanted to post my Mickey version because I think it turned out adorable :) I will be making these to use as party favor bags to hid all the goodies and we are also going to have a pinata so the kiddos can use their little bags for that too! I will also take better pictures tomorrow when I actually have light. (this house is horrible because I'm in a townhome and we are in the middle unit so no window on two sides of the house )


Now let me tell you how I did it. With your red felt you will need to cut out 2 pieces that are 7 in. by 11 in. Then in the bottom corners you will cut out 2 in. by 2 in. square. You will also need to cut 2 pieces of black felt 4 in. by 11 in. for the top and two ovals for the ears and two little wite ovals for Mickey's little buttons. Here are all my pieces cut.


I started by sewing the corners into the red pieces. This is what the corners should look like.


Then I attached the black pieces to the red pieces like so.


Now you will sew the bag together. You will sandwich the bag pieces outsides touching each other and you will put the ear pieces in between the bag pieces. I suggest you pin it all. If you didn't understand my funky wording lol here is what mine looked like before I sewed it together.


Make sure that when you sew your seams on each side of the bag are lining up and the seams at the corners line up so your bag lines up nice. Don't be afraid to tug a little to make things line up :)


Once you have sewn everything together turn it right side in and trim all your threads. Next I put on my little white buttons. What I did was hot glue them just so it was easier to line them up the way I wanted them but you can choose to sew them it's up to you.


You're almost done! The final thing to do is I took some 7/8 in. ribbon and cut two 18 in. pieces folded it and doubled an inch of it over and put the raw end up against the bag so that it's hidden when you sew it together and I just used a zig zag stitch making it as large as I could and ran the seam. And this is the end result!


All together planning, cutting, and sewing it took me about an hour so it's a pretty quick process now that you have the dimensions and the know how. So get working and have fun!!!

UPDATE: As promised, I am posting a picture of the Minnie Mouse bag for you too. Just got done with it!


I know it's hard to see the handle color, Minnie's is white and Mickey's is yellow :) Pin It

Tuesday, July 31, 2012

Ashley - Minnie Mouse Party Part 5

So been trying to take party decorations and put a new spin on them. Last year I bought those little fans that you hang from the ceiling?


Well I had mentioned before that I had been cutting out tons of minnie mouse heads, well those were for these. I took some ribbon ( couldn't find what I wanted so I bough some white shimmery ribbon ) got out the glue gun and scissors and got to work :)


And you can see the Adorableness that turned out!


Now only 38 more heads to glue ( One on each side of my twenty fans ) Enjoy!

UPDATE: Better pictures for you and an idea on how to hang them. I'm going to hange them from the ceiling like it shows on the packaging so my fans are double sided but if you wanted to hange them like garland on some string it's pretty cute too :) Let me show you!


Pin It

Friday, July 27, 2012

Ashley - Minnie Mouse Party Part 4

Ok so I have been trying to think of something that I could do for a hanging for my door for Melody's party. Melody was asleep though and I really didn't feel like running to the store and spending more money when I could make soemthing here with the stuff I already had. So with that in mind this is what I came up with.


I did this with some paint, cardboard, some left over card stock (because I didn't think to cut the ears out of the cardboard too lol ) a piece of wire, and some bits of left over pink polka dot streamer.

First I sketched out the number I wanted on some cardboard sitting in the recycling bin.


Next I cut it out. After I cut it out since the cardboard was corregated ( Pardon my spelling if it's incorrect ) I took some masking tape and sealed the sides so it would have a more finished edge.


After I was done with that I got the paint out. For the bottom half I first painted it white.


Then while that was drying I painted the black and then finally the pink. I used a piece of scrap cardstock cut out in the shape of a circle to help me outline my polka dots. I had to do a bit of touching up but it worked out pretty well.


Then since I didn't cut the ears out of the cardboard (duh) I used some left over card stock again to make the ears and hot glued that into place.


Then I took some scrap pieces of polka dot streamers that I was thinking about using for her party and folded it and glued the ends together. Then I took another scrap to wrap around the middle of the bow and act like the knot and glued that in place.


I was a little bummed after this step because I thought I had soem ribbon left over from back when I made Melody's Minnie easter basket but I was wrong so instead of using that as a hanger I had some wire from a project that is the same color as my door so it blends in well lol. And I hot glued that into place and that was it!


An adorable hanger and I didn't have to spend anything! All in all a great day!!! lol Enjoy! Pin It

Monday, July 23, 2012

Ashley- Minnie Mouse Party Part. 3

Hey everyone! I have been working for days now cutting out what seems like millions of Minnie Mouse heads to use for the decorations for Melody's party and this is how I used just a few of those heads.


I've seen banners like this on pinterest and I thought they were just too adorable so I thought that I would try my hand at it and make a tutorial of it so you could make one too if you wanted to. First off let's get your supplies rounded up.

You will need:

Scissors
Glue gun
Gluestick
Ribbon
Black Cardstock
Printer with Paper
Hole punch
Mickey/Minnie Mouse Silhouette printed out
Disney font
( you can find free ones, you can find them on pinterest)

First things first take your printed out Minnie Mouse head silhouette out and cut them out. You will use these to trace the heads onto the cardstock. I know it's hard to see in the picture I'm sorry I couldn't find a pen or pencil to make a easily visible line so I ended up using a red felt tip pen.


After you trace all your heads that you will need ( if your just writing out the words "Happy Birthday" you will need 13 heads) you will cut out the heads. Once all your heads are cut you will get your ribbon out and start cutting lengths of ribbon out to make your little bows. If you are having trouble making the bows you can look on pinterest and they have awesome tutorials with a step by step process. 


After you get them cut it's time to tie!


Now that you have all the bows made you can set them aside and fire up the computer. You can find the font I used on my pinterest account under party ideas if you're following me.


 I made the letters size 200 and I made them BOLD and I capitalized them all. Print out your letters making sure to first let the ink DRY and second to leave enough space in between them to cut your circles out around them. The guide I used to make my circles before I cut my letters out was actually the ribbon spool that you see in the picture up above. At any rate cut out your letters. Then it's time to get the gluestick and get to work gluing your letters to your Minnie heads.


So your letters are glued on now so we will move onto making the holes to weave your ribbon into. I have a tiny hole punch that makes these little baby holes so I actually had to hole punch 4 times in a line to make the holes big enough that the ribbon doesn't fold in on itself.


It didn't show either so that was nice, nobody will be able to notice if you have to make more then one punch. Go ahead and get all of those punched out and then we are on the final stretch. After your all done with that take your Minnie Mouse heads and weave them onto your ribbon in order like this.


This next step that I did is optional, what I did was I got my hot glue gun out and heated up and I spaced out the heads where I wanted them and I glued the ribbon and the head together so they won't get shifted when I store them (since the party isn't until Sept. 8th lol) and that way it won't pop my bows off if the heads shift around on the ribbon . But if you decide to skip that step you still need to plug in the glue gun so you can glue your bows onto the ribbon.


Remember a little glue goes a long ways.


Wait for your glue to cool and...... 


your new adorable Minnie Mouse banner is ready for the party!!!


Enjoy!


Pin It